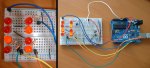
I’m working on an micro-controller driven variable capacitor, here’s some video:
howtos, tips, news and more
I’m working on an micro-controller driven variable capacitor, here’s some video:
I’ve been very busy with electronics lately, so busy that I forgot my password for this blog!
Before this post, probably a year ago, I was experimenting with charlieplexing. Not much after, I somehow started to get entangled in radio oriented electronics.
I knew I wanted to learn more about analog circuits and the limitless theory that lurks behind it. I decided to build my own radio receiver. What I didn’t realize was that this was going to be one of the hardest learning paths I’d encountered yet. Bare in mind that I had just barely understood what a voltage divider was and had no practical understanding of common components, like a transistor.
This post is an attempt at explaining the do’s and don’ts about electronics design from the perspective of a novice with about 1.5 years experience.

My first etched PCB
Learn how to experiment
I spent countless of hours playing around with resistor values without even understanding what results I wanted. It’s crucial to know what you are aiming to achieve, even if you do some minor poking. Last Autumn I wasted a lot of time while trying to build radios, none of them really worked. Even if you are a beginner at something and more importantly if you are learning alone, make a detailed plan of what you want to achieve and be proud of it. To me electronics usually feels like voodoo magic (isn’t it?), but then when I tackle all the mysteries step by step, without being too ambitious, things start to make sense. Hence, to truly benefit from experimentation, you need to understand all the concepts you are dealing with. First build a simple design by someone else, study it, and then tweak it.
Have the right equipment
If you are going to design something, you need to have both the right tools and materials to do so. You need to decide early enough, how serious you are about your project and what you need to procure in order to complete it. It doesn’t mean that you need all the gear in the world. I wanted to build an radio and it didn’t take long for me to realize that I couldn’t do it without an oscilloscope, so I bought one second hand. Alas, I wasn’t blind anymore, suddenly I could play around with oscillators and actually see something happening. The point isn’t that you should buy an oscilloscope, but that for certain situations you just need to have some specific equipment at hand. For example, if you’re going to do something with electronics, you definitely need an multimeter. In addition, understand the components you’re going to need for your project and buy them! Dont try to reinvent the wheel by trying to play around with a limited set of parts to achieve amazing results. I tried to make variable capacitors out of cardboard and aluminum foil, guess what, it didn’t really work. Sure it was fun, but it was much funner with a proper variable air capacitor. When you have the right equipment, materials and knowledge, you can even design your own tools. But you have to start somewhere.

Regenerative receiver in an old PSU case
Enjoy
There is nothing more rewarding than reaching a set goal. Complicated projects require many steps, but if laid out correctly, each one is surprisingly simple. Now only if I ever learned to document my work properly!


I’m very new to electronics prototyping and I bought my Arduino Uno about 2 months ago. I like this new hobby, for a Business IT student, it’s the perfect way to see the result of your programming in a physical form without spending that ever so valuable little cash I have. The binary temperature monitor is my first real project. The needs behind the project were: display the temperature reading using an thermistor, do that with what resources I had available (10 leds) and finally migrate the project to an Attiny85 microcontroller.
First I thought about making an led matrix to display the numbers in denary, but after pondering for some time, I realized that 10 leds in whichever arrangement would not be enough to display numbers, not to mention double digits. Then came the idea of using two rows to display readings in binary. That seemed much better, 2 rows with 4 leds each, equaling to 8 leds total. Just enough for my led quota.
The next steps included:
At this point my project was working and with some adjusting here and there, I was rather proud of myself. However, I wasn’t ready. I wanted to migrate the project to the Attiny85 I had bought mainly for the use of standalone applications such as this one. I thought that I’d understood the pin configuration of the Attiny85, but I was wrong, it took me quite a few hours to find out that in fact, digital pin 4 came before 3. Finally, I got the project working on the Attiny. Since then I’ve changed the 220ohm resistors for 820ohms and added a voltage divider to pull 3v from my 4×1.2v rechargeable AA battery pack, resulting in an battery life of at least 30 days of accurate readings.
At some point I want to etch my own PCB for this project to make it permanent. It’s quite soothing to watch while the leds shift as the temperature changes. I suspect it also enhances my work tempo as a morale booster.
Thanks to all the Arduino community for all the help I found! I also hope that someone might benefit from this project. Also I’d like to hear if you’ve got some ideas on how to modify/improve the project.
This is just a short post about how I finally, after considerable troubleshooting, got my attiny85 programmed. I followed the High-Low Tech guide for programming my attiny85 with the Arduino Uno. However when I tried to upload the blink sketch to the attiny I got a bunch of errors(e.g. avrdude: stk500_cmd(): programmer is out of sync, avrdude: stk500_paged_write(): (a) protocol error). I rechecked everything (software, wiring, etc) way too many times just to run into the same problem again and again. Finally, what worked was to distribute grounds to various GND pins on the Arduino board. Now I’m not exactly sure which one did the trick, but anyway everything works flawlessly now. Actually the trick is to drop the baud rate to 9600 in the Arduino ISP program, and also edit the programmers.txt in the arduino > hardware folder.
avrisp.name=AVR ISP

avrisp.communication=serial

avrisp.protocol=stk500v1
avrispmkii.name=AVRISP mkII
avrispmkii.communication=usb
avrispmkii.protocol=stk500v2
usbtinyisp.name=USBtinyISP
usbtinyisp.protocol=usbtiny
usbasp.name=USBasp
usbasp.communication=usb
usbasp.protocol=usbasp
parallel.name=Parallel Programmer
parallel.protocol=dapa
parallel.force=true
# parallel.delay=200
arduinoisp.name=Arduino as ISP
arduinoisp.communication=serial
arduinoisp.protocol=stk500v1
arduinoisp.speed=9600
Hope this helps someone out there experiencing the same problem.
Many of you will recognize voip clients such as Teamspeak and Ventrilo, probably because you’ve used them to talk with friends while you play a game. Both the Ventrilo server and client have been my top choices for a long time, until now. Behold Mumble, an free opensource voip client. Ok, its free and opensource, that doesn’t convince everyone. However, Mumble has quickly become my first choice because it’s simply above all of it’s competition. Alright now a little background is needed. Recently I was playing Bloodline Champions (fast paced game similar to DOTA), while communicating through Ventrilo. My friend and I live in the same flat, and he was also playing the game. I instantly noticed a big delay in my voice reaching my friends speakers. In a fast paced game, this is unacceptable. So I started looking at alternative programs and quickly found Mumble.
Have a look at this, if you don’t believe that Mumble is superior: http://www.youtube.com/watch?v=qMfF36NvoJc
I’m going to post about the minimalistic Mumble(Murmur) server called uMurmur sometime soon 😉 Hope you enjoy using Mumble!
Alright I finally got Debian installed on the Amilo Pro 2030 laptop. There were a few problems that I managed to solve, like an invisible mouse pointer/cursor and the wireless. So I’d like to share the solutions here:
edit /etc/X11/xorg.conf
add
Section “Device”
Identifier “Configured Video Device”
Option “HWCursor” “off”
Option “SWCursor” “on”
EndSection
Add the contrib repositories to /etc/apt/sources.list
e.g. deb http://ftp.debian.org/debian/ lenny main contrib
apt-get update

apt-get install b43-fwcutter
Download and setup the firmware when prompted.
Voila. Now get something to manage your connections according to your windows manager, I use wicd with LXDE.
 Got myself this bad boy some weeks ago and have to say I’m really happy with it. I love being able to use a phone for almost everything I could do on a PC. I’m not going to make this a very long post, this is more like an introduction to following n97 posts that I might write in the future 😀 But so this post doesn’t become a load of useless blabbering, I’m going to add a few applications that I’ve found very useful:
Opera Mobile 10 beta- so much better than Opera Mini, and very intuitive
Symtorrent- who wouldn’t want to exploit the cafeterias wlan and watch a few movies on the road
Google Maps
Nimbuzz- I use this to chat on MSN and talking on Skype, but it also supports Yahoo Messenger and ICQ among others
Winrar
Python for Symbian
If you own a stick or more of this ram you’re in luck, you’ve well spet your money. These babys are very affordable and can be pushed to perform better than some more expensive competitors. However if you don’t pay attention, you might be mission out on the good stuff. My motherboard automatically set the ram at 5-5-5-18, which is not really where you optimally want to be since these sticks handle faster timings. 4-4-4-12 is where I’ve had mine for a long time at 2.1V (default 1.9V), but now I’m trying 4-4-4-10. With my cpu at 3.6ghz and my memory multiplier at 2.0D the system runs pretty nicely. Note that I’m not pushing the mhz higher than the original 800mhz. Give the timings a shot if you haven’t already 😉
A lot has happened since I last wrote about my pc. For starters, I screwed up my bios while flashing it… I was using a nifty Gigabyte utility called QFlash to upload a newer bios from a USB stick. I’m still a little confused at what went wrong, but in the end my computer could not boot. It couldn’t revert to the bios backups, so it just kept restarting while cycling them through. Finally, after trying different components on the mobo without luck, I took it to the shop. They sent it to Gigabyte, and after a little over a month, I got the same board back. Now it worked. To clarify things a little, I’m sure that this problem was not related to my incompetence, just bad luck.
Everything has been working fine now, and I’ve been able to change a few things in my everyday setup. Before I had the Intel e8400 overclocked to 3.8ghz, but now I decided that 3.6ghz was good enough, since I changed my ram timings to 4-4-4-12. I’m sure I could easily push the cpu more, but I’d have to start compromising ram speed.
Now I’ve also got 2 SATA HDDs working in a RAID0 setup, something I had never tried before. All in all everything is working perfectly, and I’m glad to have a fast system again 😀
 I’ve been looking for the highest working overclock for the Zotac 8800 GT Amp and now I’ve got some results. Originally the card was 700mhz core,1700mhz shader and 1000mhz clock. I pushed the card to perform well with 728/1812/1061.
To increase the fan speed to 100% and set clock frequencies I’ve used RivaTuner. I use Atitool to scan for artifacts, and play some UT3 to test stability. I should use Crysis, but I’m too lazy to install it. Anyhow this testing method works rather well, and I’m surprised at how far the Zotac can be pushed.
I need to do more teting, since the memory can most likely be clocked more. I’m using my older pc to run the tests, since my new motherboard is screwed (messed up bios), but when I get it replaced I’ll have more detailed info. The ga-ex38-dq6 gives me a more stable overclock aswell since I can increase voltage for stability etc… It’ll be interesting to compare the 8800gt to the 9600gt once I have more results.


